
Note: You may be seeing double! This is the first blog post I have written to be published on my website as well as on PhotographyRoundtable.com
When shooting landscape images there are a few practices I always follow. The first of these is to always shoot on a tripod. Tripod shooting slows me down and gives me time to decide if there really is a photo at this location – I avoid shooting on the fly as I am rushing past a scene. It takes a bit of time to set up the tripod and while I am extending those legs I am walking around, looking at angles and determining perspective. Then I slowly compose my image: look at all four corners of the frame for distracting elements or triangles, blur my vision to see the scene abstractly to better create balance between shapes such as triangles and rectangles, and place those leading lines coming from the corners – just a few of the tricks used in determining a composition.

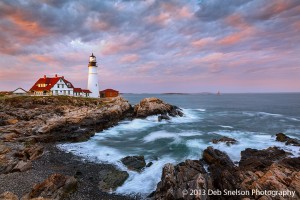
If the scene before me is mostly static I know that aperture priority is the quickest and easiest way to achieve the results I want. Who says we have to use manual mode for landscape scenes? The most important choice for a landscape scene is the depth of field. Sometimes I want the image sharp front to back, and other times I want to soften the background to convey a greater depth. Sometimes I am right on top of an element in the foreground, and sometimes the scene is all about the same distance from my lens. These all help determine the aperture I want to use to convey the story. Since my favorite time to shoot is in the low light of dusk and dawn, a slow shutter speed to blur water or bustling clouds will occur naturally – long exposures. I can always change my aperture just a bit, add a filter, or make that switch to manual if more motion blur is needed.

And the third practice I always use is to shoot in Live View with exposure simulation – enable this in the camera’s menu. Live View has several advantages. For one, it shows you how the camera ‘sees’ a particular scene. The mirror is locked up, allowing you to see the ‘live’ effects of changes to exposure, ISO, white balance and other camera settings which would not be visible through the viewfinder. The image will get brighter or darker right on the screen as you make your changes. I also like the ability to manually focus in Live View. Autofocus in the Canon EOS 5DMkIII has an abundance of focus points. But typically I want my focus somewhere not under one of those set focus points. Live View allows me to move a magnifying box right to where I want the sharpest focus, which is usually something in the foreground that I want to draw the viewer’s eye. I also use this location to determine my aperture setting, by judging my hyperfocal distance to that point. For example, if the object I am focusing on is 5 feet in front of me, and I want front-to-back sharpness with my focal length at 24mm, I may choose an aperture of f/16. With my focus point selected and the focusing box moved over the spot (toggle switch), I can magnify the spot 5x (one click on the magnify glass) or 10x (a second click) to get that focus precise.
So here is the quick and dirty part – at least for the Canon cameras that I have owned – after focusing I can move that focus box around the frame to change the distribution of light in the Live histogram – a the histogram displayed right on my Live View screen is reactive to real-time changes in light. The camera is in manual focus, so moving the box after focusing does not change focus. The camera, a very sophisticated computer in its own right, is determining the shutter speed based upon the area highlighted – when you trigger the shutter while still in Live View the image captured reflects what was visible in Live View. Let’s say I forgot to move the focus box and I had zoomed in to capture focus on a dark part of the scene prior to making an exposure, and the recorded image is a perfect exposure for those dark areas but has blown the highlights in the sky. I can very quickly move the focus box to a lighter spot within the scene which will change the shutter speed, and expose again. I can continue if needed until the reviewed image shows no blown highlights or crushed shadows, or, since I am shooting on the tripod, I can combine the various images with exposure blending in Photoshop or use HDR software to extend the dynamic range of the resulting image. This feature eliminates the guesswork of setting a bracket range – you can capture all the highlights in one shot, all the shadow detail in another, and throw in a midpoint exposure and know you are all set for exposure blending.
Comments are welcome – I’d love to hear from Nikon, Pentax, Sony and other shooters to know if your camera works the same way or if this is specific to Canon!
Karen
3 Dec 2015one of your best articles!
Deb Snelson
3 Dec 2015Thank you Karen! Hopefully there will be more to come!